Moving to my new (web)space
I am currently moving this site to my main domain. The contents here will be stripped to the tutorial and related stuff.
The new site can be found at log.bahnfreikartoffelbrei.de.

Websites that answer a single specific question
Hints are welcome. Comment here or over at Mastodon. In case of updates post gets republished.
- BER - Berlin Brandenburg Airport
-
The first question touches a sore spot - Germany's most famous airport (BER). The construction project has been full of scandals involving mismanagement, patronage, bad planning, massive budget overrun and, of course, delay:
"Is the BER already open?" - though the answer is incorrect now
or
"Has the BER been finished yet?" with more sad details (German)
- Friday?
-
This is an easy one:
"Is it Friday?" (Danish)
- Traffic
-
The third site answers the question whether the avenue behind the Brandenburg Gate in Berlin is closed for traffic (which often is the case due to public events like marathon, turn of the year or national ceremonies):
"Is the 17th of June Street closed?" (German)
- Tech
- Transportation
-
The container ship Ever Given grounded in the Suez Canal completely blocking any traffic:
Mastodon: Timeline beleben
Ich stelle aktuell wieder einen kleinen Zulauf bei Mastodon fest. Eine häufig gestellte Frage ist, wie man interessante Leute findet, denen man folgen möchte.
Timelines
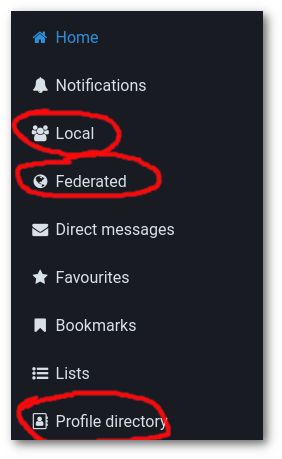
- Local
-
Als Neuling startet man gewöhnlich mit der Registrierung bei einer bestehenden Instanz, das heißt, die lokale Timeline der Instanz ist einen regelmäßigen Besuch Wert.
- Federated
-
Die instanzübergreifende Timeline kann je nach Instanzsetup, Tageszeit und Interesse mehr oder weniger ergiebig sein, häufig sieht man die Tröts vor lauter Spam nicht, trotzdem sollte man hier zumindest mal reinschauen.
Profilverzeichnis
Hinter dem Profile directory versteckt sich eine ganz nützliche Übersicht von aktiven Nutzern der eigenen und anderer Instanzen. Hier sieht man auch, wie nützlich es für andere ist, eine Kurzbio und ein Profilbild einzupflegen. Diese Übersicht muss nicht in jeder Instanz aktiv sein.
Bemerkung
Möchte man nicht im Profilverzeichnis gelistet werden, kann man dies in den Einstellungen unter Profile -> Appearance -> List this account on the directory deaktivieren.
Hashtags
Die Suchfunktion lässt immer noch zu wünschen übrig und so ist die Suche nach Hashtags am zielführendsten.
Entweder sucht man direkt in der Suchleiste in der linken Spalte (siehe auch den dort erscheinenden Tooltipp) oder ruft die URL <instance>/tags/<tag> auf.
Verwendet man das advanced web interface, also die Mehrspaltenansicht, kann man die Stichworte als eigene Spalte anheften.
Leute
Mit ein wenig Klicken und Scrollen in den Timelines findet man schnell das ein oder andere Profil, bei dem man genauer hinschaut. Falls man gar nicht weiß, wo man anfangen soll, folgt man zunächst seinem eigenen Instanzbetreiber (zu finden auf der About-Seite).
Neben den Posts sind folgende Punkte interessant:
Wird das Profil aktuell verwendet? Mastodon hat immer mal wieder kleine Hypes erlebt, es gibt viele verwaiste Profile.
Wem folgt diese Person?
Wer folgt dieser Person?
Welche Interessen hat die Person (Kurzbio, Featured hashtags)?
Gibt es interessante Profile im Profilverzeichnis dieser Instanz (obere Leiste auf jeder Profilseite)?

Bots
Menschen sind ja auch nicht alles. Da das ganze Fediversum auf freier Technologie basiert und auch Mastodon einfach per API zugänglich ist, sind automatisierte Posts nicht weit. Dafür gibt es mit botsin.space eine eigene Instanz.
Bei den überwiegend sehr ernsthaften Beiträgen auf Mastodon können Botbeiträge durchaus stimmungsaufhellend wirken.
Aktiv werden
Bei Mastodon wird man ohne Zutun nicht so einfach bespaßt, man muss sich selbst um seine Unterhaltung kümmern. Dazu muss und kann man auf verschiedene Arten aktiv werden:
fav, was dir gefällt
booste, was dir besonders gefällt
kommentiere, und sei es ein schlagfertiger Spruch oder einfach ein Danke, egal - was soll passieren?
vervollständige dein Profil, in der Reihenfolge Avatar, Kurzbio, Links, Featured hashtags, pinne einen oder wenige für dich relevante Tröts an
verfasse einen
#introduction-Tröt (auf Deutsch auch die Hashtags#vorstellungund#neuhierverwenden) und stell dich der Gemeinde vortröte selbst, auch wenn man zunächst gefühlt ins Unbekannte sendet
Persönliche Tipps
- Poste selbst
-
Profile, die nur oder überwiegend aus Boosts bestehen, finde ich uninteressant, dann folge ich lieber dem Original.
- Alltägliches
-
Schreib auch mal was von dir, was Lustiges, Profanes, Alltägliches, wie wäre es mit einem Foto von draußen? Schreib lieber deine eigenen Showerthoughts auf als der Zehnte zu sein, der irgendeinen aktuellen Aufreger per Screenshot verbreitet.
- Mastodon-Interessen-Bingo
-
Du arbeitest in Tech, interessierst dich für FLOSS, Datenschutz, bist politisch total engagiert, gegen ganz viel und empörst dich gern? Ist ja gut und schön, aber hier auch nicht sehr originell (ja okay, Mastodons sind Herdentiere), was macht dich sonst noch aus? Hast du auch andere Hobbies (Steine sammeln, (Nischen-)Sport, Handwerken/Basteln, Schnulzen gucken, whatever)? Erzähl mal!
- CW
-
Ich möchte das Fass Content Warning hier nicht aufmachen, nur eins: es muss nicht jeder Inhalt hinter einer CW versteckt werden. Im Gegenteil, ich komme mir verarscht vor und halte es auch für den Umgang auf der Plattform hier für kontraproduktiv, diese Funktion im Übermaß zu nutzen.
Click
folge FediTips (en) für mehr Feditips
TUXEDO laptop keyboard
Inhalt
Recently it was finally time to replace my beloved Dell notebook. I gave TUXEDO Computers a try.
This article may in part apply to other models but I refer to the TUXEDO Book BC1510 using Archlinux.
Driver installation
This seems a no-brainer but for the sake of completeness it shall be mentioned to install the TUXEDO keyboard driver to enable backlight functions and Fn/media keys. The easiest way to do this is installing the package from the AUR.
Toggle touchpad on shortcut
Oddly enough there doesn't seem to be a Fn/media key for toggling the touchpad which is a function I personally use quite often.
The common way to assign keyboard shortcuts is using xmodmap by customizing the .Xmodmap file in the user's home.
Assign XF86TouchpadToggle to a key or shortcut.
You can find out whether the function is theoretically assigned to any key by searching for it:
$ xmodmap -pke | grep Touchpad
------------------
output for BC1510:
------------------
keycode 199 = XF86TouchpadToggle NoSymbol XF86TouchpadToggle NoSymbol XF86TouchpadToggle
keycode 200 = XF86TouchpadOn NoSymbol XF86TouchpadOn NoSymbol XF86TouchpadOn
keycode 201 = XF86TouchpadOff NoSymbol  XF86TouchpadOff NoSymbol XF86TouchpadOff
Test the functionality by executing the keystroke via xdotool:
$ xdotool key 199
This probably works except you are using...
GNOME Shell
Long story short: xmodmap does not work with GNOME Shell/Wayland. If you intend to take the red pill take this way to XKB, or take the blue pill by just assigning the function to a shortcut via gsettings.
Open dconf-editor and pilot to org.gnome.settings-daemon.plugins.media-keys/touchpad-toggle and set a custom value, p.e. ['F4'].

No touchpad symbol? F4 unoccupied.
Keyboard backlight
Now comes the fun part. You don't buy a device with keyboard backlight without making use of it.
By default on boot the backlight is white. The integrated backlight of the BC1510 model is RGB so it's playtime.
Media keys
Backlight control via shortcuts is available on numpad keys:
Fn + /: cycle through a preset of colors (red, lime, blue, yellow, fuchsia, aqua, white, off)
Fn + *: toggle backlight on/off
Fn + +: increase brightness
Fn + -: decrease brightness

Backlight keys.
TUXEDO Backlight Control
The TUXEDO Backlight Control provides a CLI and Tkinter GUI to control the keyboard backlight. The package can be installed from the AUR.
There are some shortcomings:
The authentication restrictions are annoying and IMHO pointless. There is no need to require superuser rights when changing backlight colors.
There is no option to adjust brightness.
Custom colors can be defined but must be written in a colors.conf file (required superuser rights).
The enhanced TUXEDO Backlight Control
Achtung!
Only developed and tested with Arch.
I created a tweaked version to get rid of the negative aspects mentioned above.
First, there are no more password prompts when executing a backlight command or launching the GUI (adjusted PolicyKit permissions).
Second, there are two new functions in the CLI:
# brightness control, set a value between 0 and 255, example:
$ backlight 124

# set a custom color by passing the hex color code, example:
$ backlight color ff5900
One may want to process the backlight command in scripts, for example visualize low battery status, notifications or graduently changing colors depending on the time of day...
Download forked version from encarsia/tuxedo-backlight-control (Arch package available).
Looping through color preset
Bluetooth on startup
I had some trouble getting the Bluetooth controller working on system start.
According to the Archlinux wiki I set AutoEnable=true in the /etc/bluetooth/main.conf but the Bluetooth service had to be started manually every time.
The simple solution was that the systemd service still had to be enabled by executing
$ sudo systemctl enable bluetooth
It's easy if you know what to do...
FFmpeg tricks
How many posts only exist so the author could close some tabs?
Timelapse
- How To Create A Time Lapse Video Using FFMPEG
- Convert sequence of JPEG images to MP4 video
- Timelapse from GoPro images with FFmpeg
Various commands
Embed Pixelfed posts (with Nikola)
Pixelwhat?
Pixelfed is the photo sharing platform of the fediverse. The FOSS version of Instagram so to speak.
Recently I stumbled over the option to embed posts. You can generate the code via the post's centext menu. I discovered that embedding posts work even if this context menu is not available.
Shortcode for Nikola
The approach for creating and using a custom shortcode for Pixelfed corresponds basically to embedding Mastodon toots which I have already written a pretty informative blog post about.
How to use
Save the pixelfed.tmpl file in the shortcode folder of your Nikola site.
You can use the shortcode with reStructuredText and Markdown markup.
What's hot & what's not
As stated before Pixelfed is in an early stage of development and not everything works flawlessly.
Embedding... |
Status |
|---|---|
single photo post |
works |
album post |
|
animated GIF |
works |
video |
works |
profile |
works |
collection |
does not work yet |
hashtag |
does not work yet |
This is my profile.
I post pictures of small things.
Alm posts pictures of cats.
Sven (esureL) posts pictures of painted distribution boxes (and food).
Keep moving.
Soon to come
The main developer has stated that everything that is not working will do so in the near future.
This points to an album post.
This points to a collection.
This points to a hashtag.
Die Deutsche Wohnen ist scheiße - und nun?
Inhalt
In Berlin hat die Unterschriftensammlung für das Volksbegehren mit dem reißerischen Namen "Deutsche Wohnen & Co. enteignen" a.k.a. Mietenvolksentscheid begonnen. Ich halte diesen Plan für ein wenig erfolgversprechendes und rachegetriebenes Unterfangen. 8 9
Auf Linie gebracht
Ich sitze in einem Seminar für Betriebsräte einer größeren Gewerkschaft und kurz vor dessen Ende wird ein Zettel ausgeteilt und eine Diskussion zum Thema "Das Grundgesetz feiert 70. Geburtstag! Wir feiern mit!", genau genommen zum Slogan "Eigentum verpflichtet", angekündigt.
Mein Verschwörungstheoriedetektor schlägt an, denn ich glaube nicht an Zufälle. Zunächst bin ich etwas fassunglos, bereite einen kleinen Rant vor, den ich auch vortrage und habe eine zivile Konversation mit meinen Mitmenschen im Raum.
Ausgangslage
Nicht nur der Berliner Wohnungsmarkt ist, wie es immer so euphemistisch ausgedrückt wird, angespannt.
Die Berliner Politik spielt dabei eine wichtige Rolle - sie hat diese Entwicklung in den letzten 30 Jahren munter befeuert.
Der Ausverkauf
Nach der Wende befanden sich 39 % der Ostberliner und 24 % der Westberliner, oder insgesamt etwa 482.000, Wohnungen in landeseigenen Wohnungsbaugesellschaften.
Am Ende der Nuller Jahre blieben davon noch etwa 250.000 (16 % aller Wohnungen) übrig. 7
Die Ursachen darin liegen zum einen in der Privatisierung von Landeseigentum, zum anderen verringerte sich der gesamte Wohnungsbestand durch Abriss, Rückbau oder Umwidmungen, der soziale Wohnungsbau kam zum Erliegen.
Andere Faktoren, die zur Preis- und Mietsteigerung beitragen, sind hierbei noch gar nicht berücksichtigt - Anziehen der Kaufimmobiliennachfrage aufgrund niedriger Zinsen (siehe auch Finanzkrise), Gentrifizierungsentwicklungen, Umkehr des Bevölkerungsrückganges.
Die weitreichende Privatisierungen von kommunalen Wohnungen hatten einen kurzfristigen positiven Effekt auf den notorisch klammen Berliner Haushalt, aber diese Entscheidungen waren kurzsichtig und wir müssen heute mit den Folgen leben. 6
Der Feind
Die Deutsche Wohnen SE ist Eigentümerin von 111.500 Berliner Wohnungen und damit größte Privatvermieterin. Vor der Wohnungskrise war die DW einfach nur ein Vermieter unter vielen und Wohnungen zu mitunter relativ leicht erschwinglichen Preisen mit Ladenbüros mit zahlreichen verfügbaren Wohnungen in der Auslage und im Gegensatz zu manch privatem Vermieter mit professionellem Abrechnungsmanagement (BTDT).
In den letzten Jahren ist die Deutsche Wohnen immer wieder mit Negativschlagzeilen in der Presse aufgefallen. Häufig geht es dabei um enorme Mieterhöhungen, das Ausbleiben notwendiger Instandsetzungsmaßnahmen, das Vertreiben von Mietern durch überzogene und rücksichtslos ausgeführte Modernisierungen und dergleichen.
Die Deutsche Wohnen macht es einem wirklich einfach, ihre Enteignung zu befürworten.
Die Enteignungsargumente
"Beim Straßenbau werden auch Privatleute enteignet"
Eigentum ist grundsätzlich gewährleistet und eine Enteignung "nur zum Wohle der Allgemeinheit" zulässig (Artikel 14 GG). Artikel 15 des Grundgesetzes räumt die Überführung von Grund und Boden, Naturschätzen und Produktionsmittel in Gemeineigentum ein. 1
Das vielzitierte Beispiel, dass dies auch bei großen Bauvorhaben möglich ist, lässt sich mit einem "Ja, aber" ergänzen. 17 Im Baugesetzbuch heißt es nämlich auch
§ 87 (1) Voraussetzungen für die Zulässigkeit der Enteignung 16
Die Enteignung ist im einzelnen Fall nur zulässig, wenn das Wohl der Allgemeinheit sie erfordert und der Enteignungszweck auf andere zumutbare Weise nicht erreicht werden kann.
Dies halte ich für eine vorhersehbare Argumentationslinie: der Berliner Senat wird in einem Verfahren, und die Deutsche Wohnen wird sich nicht widerstandslos enteignen lassen, vermutlich darlegen müssen, dass es sich hierbei um die letzte Maßnahme handelt, die ihm geblieben ist und alle anderen Mittel ausgeschöpft sind. Das wird schwer.
Es ist zudem extrem zynisch, enteignete Privatpersonen hier als Argumentationshilfe anzuführen.
Solche Verfahren ziehen sich in der Regel über Jahre dahin und die Betroffenen versuchen alles, um sich dagegen zu wehren bzw. das beste aus der Situation zu machen. Im Fall von Umsiedlungen ganzer Ortschaften etwa für den Braunkohletagebau war dies in der Vergangenheit mit großen, auch persönlichen Dramen verbunden.
Und diese werden nun als argumentative Schutzschilde hergenommen. Das ist so respektlos und niederträchtig, dass mir die Worte fehlen.
"Es betrifft nur Eigentümer mit mehr als 3.000 Wohnungen"
Mal provokant gefragt: Wie lange, meint ihr denn, wird es dauern, bis es lauter eigenständige Wohnungsunternehmen im Besitz von jeweils 2.800 Wohnungen geben wird?
Wie soll dies unterbunden werden und wie naiv seid ihr eigentlich?
Bremsen und Verbote
Die Berliner Politik hat angesichts der sich zuspitzenden Lage auf dem Immobilienmarkt in den letzten Jahren versucht, mit dem Gesetz zur Mietpreisbremse 10 und dem Zweckentfremdungsverbotsgesetz dagegen zu wirken.
Das Problem bei der Mietpreisbremse ist, dass sie sich leicht umgehen lässt 11 und das des Zweckentfremdungsverbots, also das Verbot des kurzfristigen Vermietens von Wohnraum als Ferienwohnungen, dass es schwierig zu kontrollieren und ebenfalls umgehbar ist. 13 14
Was im Ansatz richtig ist, erweist sich in der Ausführung als zäh. Zwar hat laut einer Untersuchung des DIW eine Verlangsamung des Mietanstiegs 12 und auch ein leichter Rückgang der Airbnb-Angebote stattgefunden 15, doch das Ergebnis kann nicht befriedigen.
Die Kosten
Der wunde Punkt - was kostet denn so eine Enteignung?
Grundgesetz Artikel 14 (3) 1
Eine Enteignung ist nur zum Wohle der Allgemeinheit zulässig. Sie darf nur durch Gesetz oder auf Grund eines Gesetzes erfolgen, das Art und Ausmaß der Entschädigung regelt. Die Entschädigung ist unter gerechter Abwägung der Interessen der Allgemeinheit und der Beteiligten zu bestimmen. Wegen der Höhe der Entschädigung steht im Streitfalle der Rechtsweg vor den ordentlichen Gerichten offen.
"In aller Regel wird der Eigentümer mit dem Verkehrswert entschädigt, den sein Eigentum zum Zeitpunkt des Enteignungsbeschlusses hatte." 2
Wenn man als Entschädigungsgrundlage einen derzeitigen Preis von 4.000 €/km² annimmt 3, bei einer durchschnittlichen Wohnungsgröße von 50 m², ergibt dies:
Selbst bei dieser vorsichtigen Schätzung von Wohnungsgröße und Preis kostet die Enteignung der Deutschen Wohnen allein über 22 Milliarden Euro.
Das sind 22 Milliarden Euro Kapital für die Deutsche Wohnen.
Das sind 22 Milliarden Euro, ohne eine einzige zusätzliche Wohnung geschaffen oder eine bestehende instandgehalten oder modernisiert zu haben.
Mit 22 Milliarden Euro könnte man im kommunalen und sozialen Wohnungsbau richtig was reißen.
Inzwischen liegt eine offizielle Kostenschätzung seitens des Senats vor. Diese kommt zu einer Annahme von 20 bis 40 Milliarden Euro, kreditfinanziert über 45 Jahre, für die in Frage kommenden über 200.000 Wohnungen. Die Initiative des Volksbegehrens rechnet hingegen mit nur 7,3 bis 13,7 Milliarden Euro. 18 19
Schlusswort
Die Wohnungsnot ist real und der Berliner Senat hat in dieser Sache nicht nur versagt, sondern vorsätzlich zur aktuellen Situation beigetragen.
Das große Verscherbeln kommunalen Eigentums trotz abzusehender Entwicklung (globale Verstädterung) und Einstellen des sozialen Wohnungsbaus, die schwach wirksame, weil leicht umgängliche Mietpreisbremse und ein de facto nicht durchgesetztes Zweckentfremdungsverbot für Wohnraum sind die vier großen Versäumnisse.
Nach so viel politischen Versagens ist mir völlig schleierhaft, wie man jetzt von genau dieser Institution einen Erfolg bei einem so heiklen Thema wie der Enteignung erwartet.
In diesem aktuell noch sehr hypothetischen Enteignungsverfahren ist völlig unklar,
ob eine realistische Chance besteht damit durchzukommen 4 5,
wie lange dieses dauern wird,
welche Kosten zu erwarten sind.
Die Deutsche Wohnen ist ein einfaches Feindbild, das Unternehmen tut viel, um seinem negativen Image gerecht zu werden.
Aber: es hat keinen Sinn, ein Exempel zu statuieren und einen Pyrrhussieg zu erringen.
Berlin hat die halbe Stadt verkauft und kauft sie dann wieder zurück, weil es den "Druck der Straße" gibt? Welch großartige Verhandlungsposition ergibt sich daraus für die Deutsche Wohnen? Kauft Deutsche Wohnen-Aktien!
Und das wird gefeiert?
Quellen
- 1(1,2)
- 2
- 3
- 4
-
stern: Verfassungsrechtler: Berliner Volksbegehren ist aussichtslos
- 5
-
Berliner Morgenpost: Enteignung: Der Faktencheck zum Volksbegehren
- 6
-
rbb24: "Berlin hat öffentliches Eigentum zu billig verkauft"
- 7
-
Berliner MieterGemeinschaft: Berliner Wohnungspolitik – Aktuelle Zahlen, Berliner Wohnungspolitik: Teil 1 – Die 90er Jahre, Berliner Wohnungspolitik: Teil 2 – Die rot-rote Koalition
- 8
- 9
- 10
- 11
- 12
-
Berliner Zeitung: So effektiv ist die Mietpreisbremse in Berlin
- 13
-
Der Tagesspiegel: Wie viele Ferienwohnungen sind schon registriert?
- 14
-
Berliner Mieterverein: Trick mit Kurzfristmietverträgen könnte nach hinten losgehen
- 15
-
rbb24: Dem Großteil der Berliner Airbnb-Gastgeber drohen Strafen
- 16
- 17
- 18
-
Der Tagesspiegel: Teure Volksbegehren in Berlin - Geld spielt keine Rolle
- 19
-
Der Tagesspiegel: Enteignungen: Aktivisten rechnen mit Kosten von 7,3 Milliarden Euro
NoN: v0.7 release
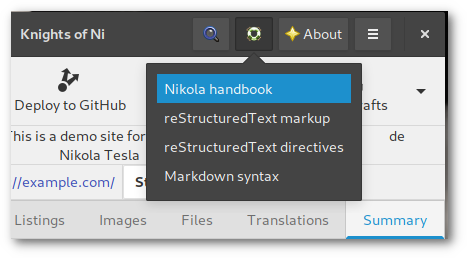
Search and Popovers
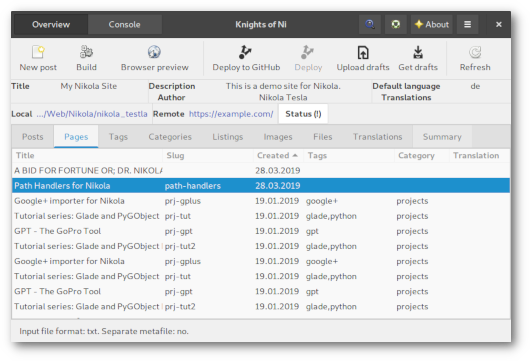
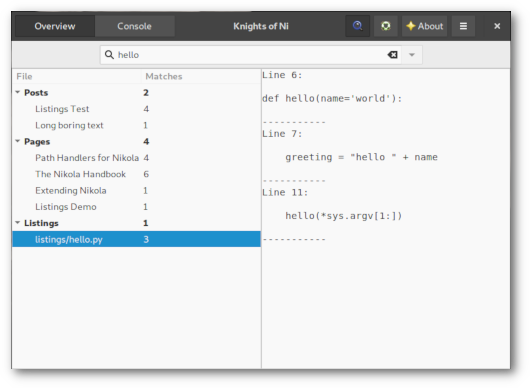
The latest release of my GTK+ client for Nikola features a brand-new search function and some GUI enhancements.
NEW: search function
This is quite self-explanatory: you can find strings in posts, pages and listings.
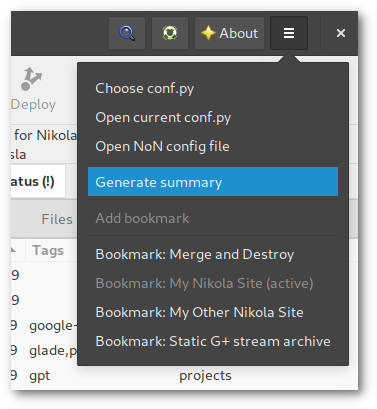
NEW: Popovers
All menus and context menus are GtkPopovers or GtkPopoverMenus now to follow the guidelines and for a better desktop integration. Popovers do not extend the main window's dimensions like menus sometimes do. They look better as they are larger and point to their parent widget/origin (so right-click context menus do not appear kind of 'lost' on the screen anymore).
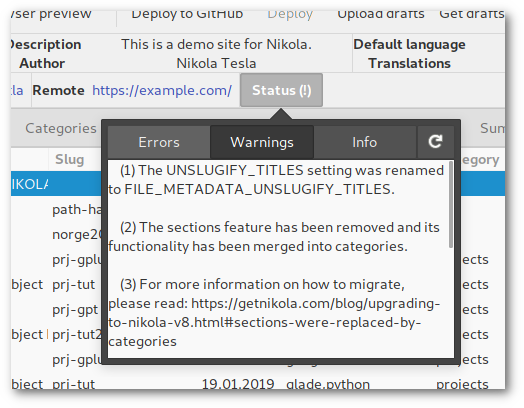
There is also a new Popover hiding behind the "Status" button which displays the output of nikola status.
This helps to show and resolve errors and warnings which may occur p.e. due to Nikola upgrade.
Changelog
-
Fixes:
all issues regarding non-flat file structure
get paths and extensions for posts and pages from conf.py so files are shown that are stored aside from the default folder structure
remove tags/categories with zero occurences
quit preview if other menu items are clicked
return from console to main window after command execution is done
-
New:
search function: find strings in posts, pages and listings
menu button to open application config file
-
Updates:
all menus are Popovers/PopoverMenus now
localization strings
screenshots
Love Boat - The Real Story. Seetag
Tag 14. Heimkehr
Seetag
 |
|---|
| Deck 11 mit Joggingparcours (rutschfest) |
Die letzte Gelegenheit für Verabschiedungen und Seekrankheit. Ich drehe die übliche Morgenrunde und mache noch ein paar GoPro-Aufnahmen. Es ist seltsam anmutende Gewissheit, dass man die Leute alle nie wieder sehen wird, aber ich bin auch froh, endlich mal wieder meine Ruhe haben und meinen eigenen Rhythmus leben zu können.
Das Deck ist gegen Mittag völlig überfüllt. Alle sitzen in Decken gehüllt draußen und genießen die Sonne. Dazu gibt es mal wieder eine Pooldeckaktion, das heißt, es wird gefressen und einer der sympathischeren Unterhaltungsbeauftragten, René, moderiert routiniert weg, was gerade anliegt, in diesem Fall irgendwas mit Wichtelgeschenken.
Auch wenn ich auch gern noch etwas Sonne genossen hätte, treibt mich die Masse an Menschen zunächst erstmal ins Innere. Da wird sich doch nicht gerade ein kleiner Lagerkoller in meinem Kopf ausbreiten? Ach nein, ich bin einfach nur regulär genervt über jeden und alles und überhaupt war die Reise mindestens zwei Wochen zu kurz!
Am Abend kippen wir noch die Flasche Prosecco, die sich K. und M. am zweiten Tag ertanzt haben und die Mädels anschließend noch ein letztes Getränk in der AIDA Bar.
Abschied
 |
|---|
| Heavy load. |
Am Morgen herrscht geschäftiges Treiben überall. Jeder musste früh raus, das Gepäck wird in den Gängen eingesammelt, ein letztes Frühstück, ein letzter Kaffee in der AIDA Bar, während wir auf die Gepäckfreigabe warten.
Als wir von Bord gehen, kommen uns schon die nächsten entgegen. Es wird geladen - Menschen, Ladung, Treibstoff - heute abend geht es wieder los.
Epilog
M. fährt mich nach Hause. Es ist Samstag Mittag und Berlin ist auf den Beinen. Es hupt. Ach ja, Berliner Straßenverkehr: Platz da, hier komm icke! Ich laufe die letzten paar Meter bis zur Haustür, sehe ein paar Gestalten in Hochwasserhosen und übergroßen Filzmänteln. Mein Gehörgang wird ohne Vorwarnung getroffen von dem dämlichen, lauten "you know, you know...like, like, you know"-Englisch der kaliformischen Expats. Was hab ich es vermisst...
 |
|---|
| This is the end. |
Heute Abend gibts Schawarma von Al Safa. Dann schreibe ich meinen Reisebericht und danach warten 75 GB GoPro-Material auf ihre Sichtung.
Ha det bra!